
To get started with the Molex API, obtain Molex API credentials and download Postman. Download Postman (version 10 or later) for free at postman.com and install the desktop app for Windows, Mac or Linux. Postman can be used for testing APIs and managing authentication; it organizes requests and displays responses.

How to Get Started
How Authentication Works
The Molex API uses OAuth 2.0 to issue client credentials. Rather than relying on a single long-term API key, Client ID and Client Secret are exchanged for a short-term access token that is included with every request.
Receiving Tokens
- The application uses Client ID and Client Secret to authenticate with the KochID OAuth server by sending a token request.
- When the credentials are validated, the system returns a bearer token. Use the bearer token to make API requests.
- The Molex API processes authenticated requests and returns a response to the application.
Environments and Endpoints
The Molex API is available in two environments: QA and Production. Each environment has a dedicated base URL. To validate the setup and requests, start in the QA environment. When everything is validated, move to the Production Environment.
- QA Environment
- Access token URL: https://login-qa.kochid.com/as/token
- Base API URL: http://test.molexapi.com
- Production Environment
- Access token URL: https://login.kochid.com/as/token
- Base API URL: http://api.molex.com
Installing Postman and Creating a Collection
This is a step-by-step guide to installing Postman.
Before getting started, it is important to understand the definition of a collection. It is a simple folder for organizing related requests within Postman. Once OAuth is configured, all requests in that collection inherit the same settings.
Step 1 - Download and install Postman
- Go to https://www.postman.com/downloads
- Download and run the installer for the appropriate operating system (Windows, macOS or Linux).
- Create a free Postman account or proceed without signing in. The software will function properly in either case.
Step 2 - Create a new Collection
- In the left sidebar, click Collections.
- Click the + icon near the top of the sidebar and select Collection.
- Name it Molex API V2. The collections panel will appear in the sidebar.
- A Molex API V2 folder will appear in the Collections panel. This should be left empty. Individual requests will be added later.
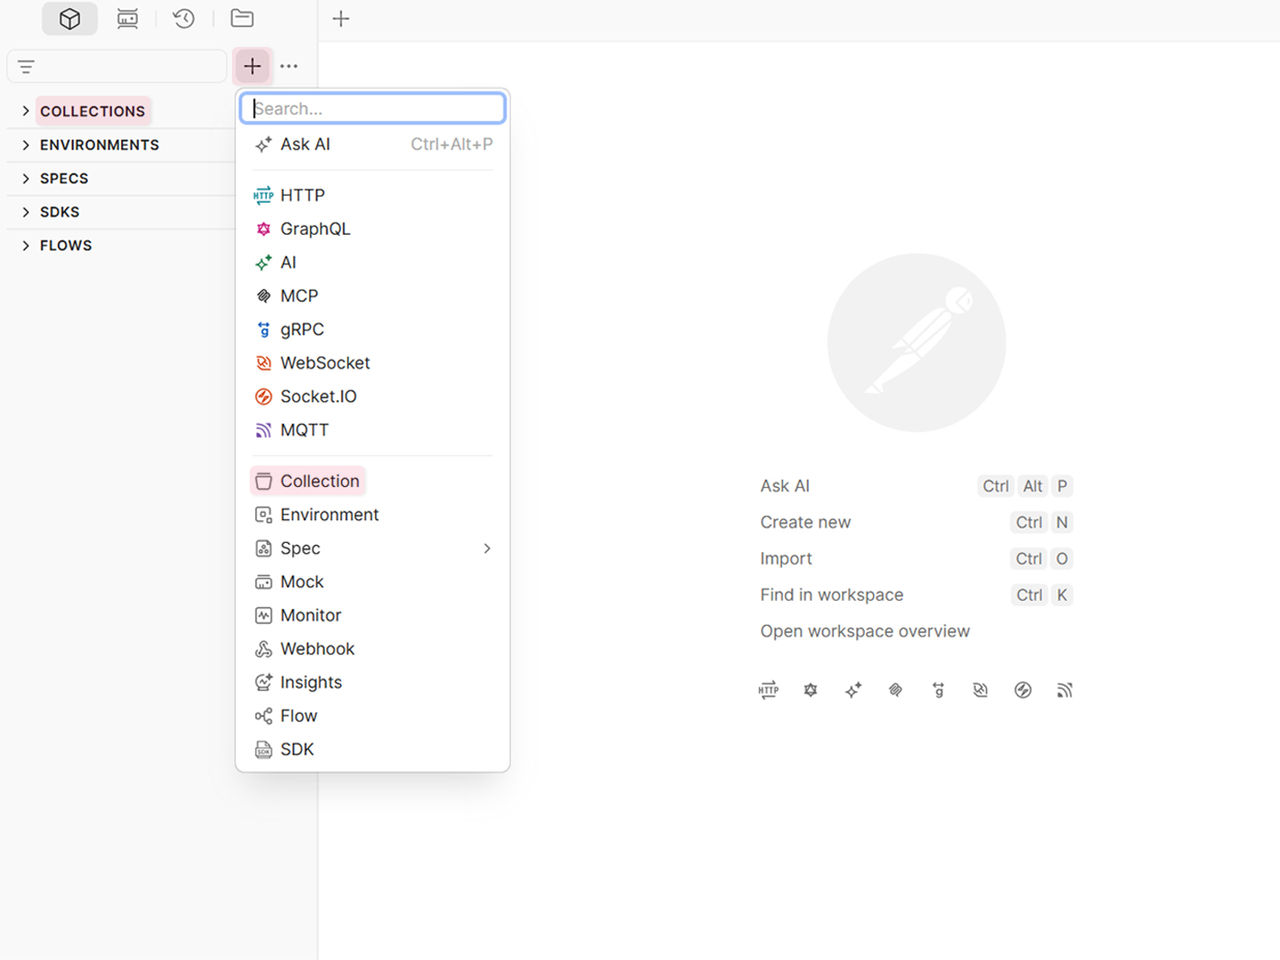
Step 3 - Create a Postman Environment
Environments are used to store your credentials and URLs as named variables, allowing you to switch between the QA and production environment without editing each one individually.
- In the left sidebar, click Environments.
- Click the + icon and select Environment.
- Name the environment QA.
- Add each variable in the table below by typing the name in the variable column and the value in the Value column.
- Save by clicking the button in the top right-corner of the environment editor.
- When you are ready to create a production environment, return to step one and repeat the process.
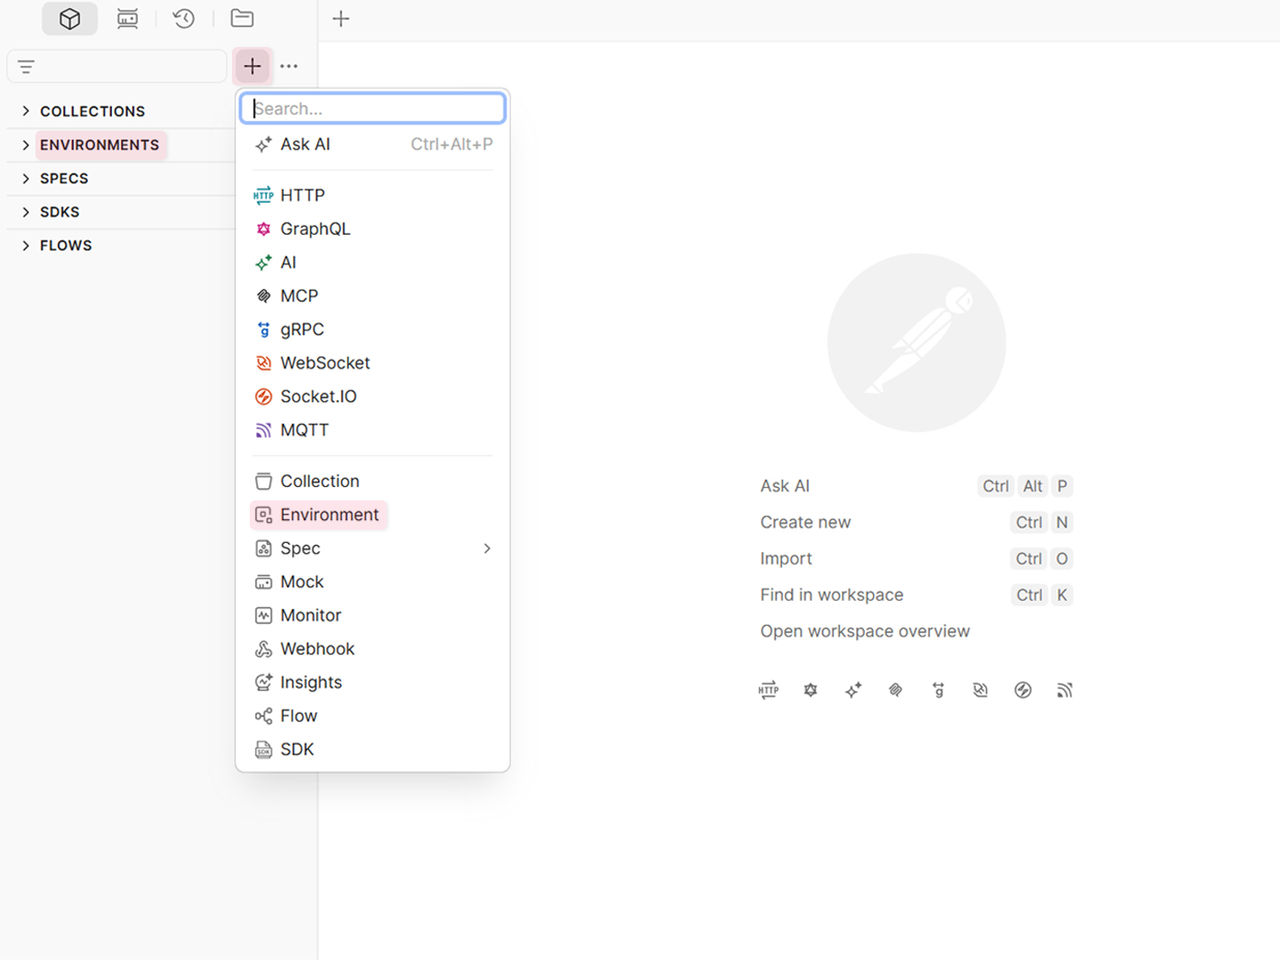
Environment Variables
| Variable | Environment | Value | Notes |
|---|---|---|---|
| tokenUrl | QA | https://login-qa.kochid.com/as/token | Where Postman requests access tokens for QA |
| tokenUrl | Production | https://login.kochid.com/as/token | Where Postman requests access tokens for Production |
| clientId | Both | {{Provided by Molex}} | Your application's public identifier |
| clientSecret | Both | {{Provided by Molex}} | Your private secret — change Type to Secret to mask it |
| baseUrl | QA | https://test.molexapi.com | Base URL for all QA API requests |
| baseUrl | Production | https://api.molex.com | Base URL for Production API requests |
How to Configure Authentication
Once the collection is open, you are ready to set up authentication. Requests added to the Molex API V2 collection will automatically inherit the collection’s token, eliminating the need to configure auth for each request.
Step 1 - Open the collection Authorization Settings
- Click the collection name to open the setting panel.
- Select the Authorization tab.
- From the Auth Type dropdown, select OAuth 2.0.
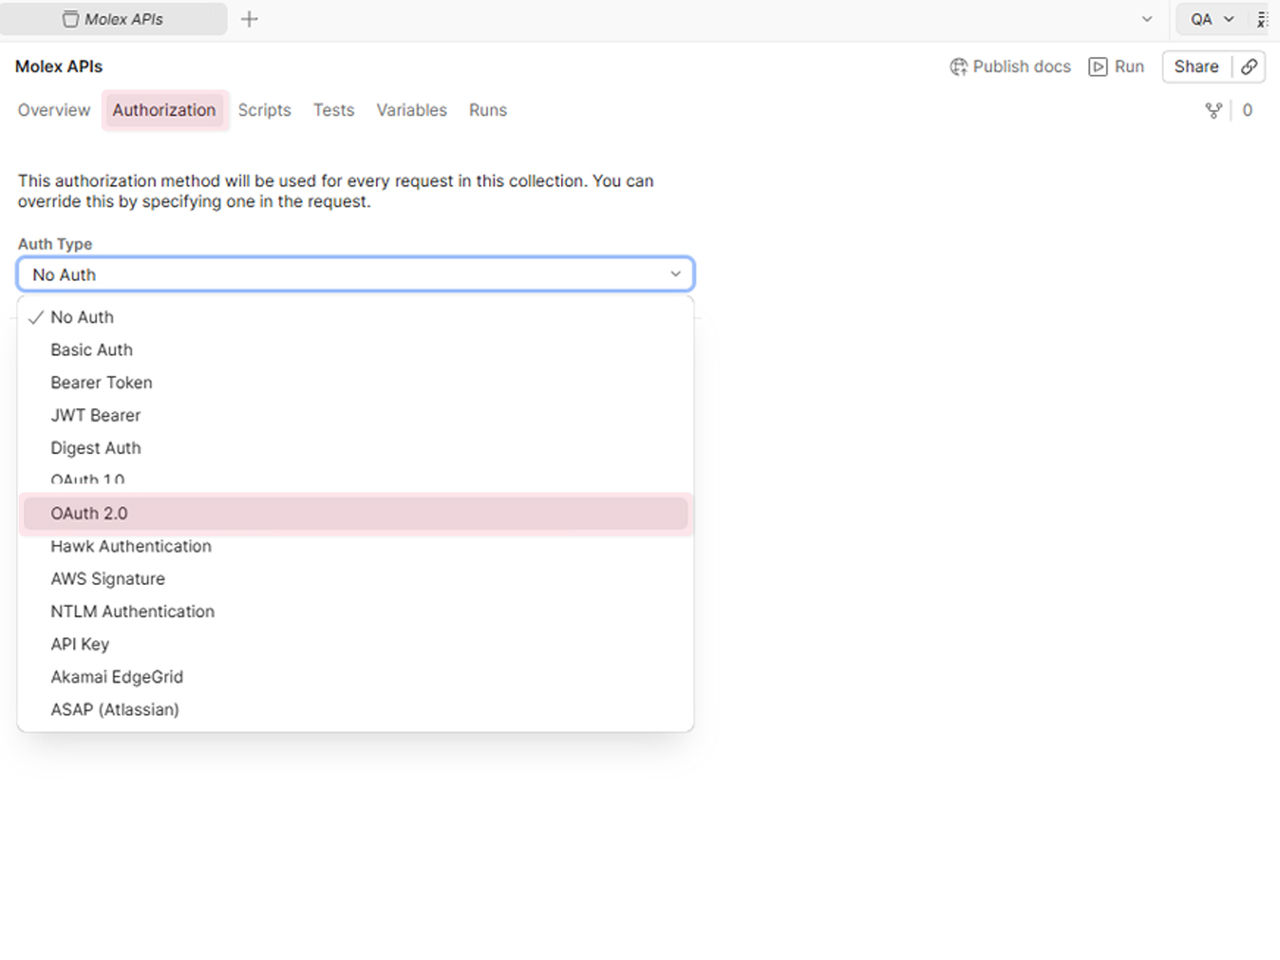
Step 2 - Set the Auth Type
- From the Add auth data to menu, select Request Headers.
- Confirm that the header prefix is set to Bearer.
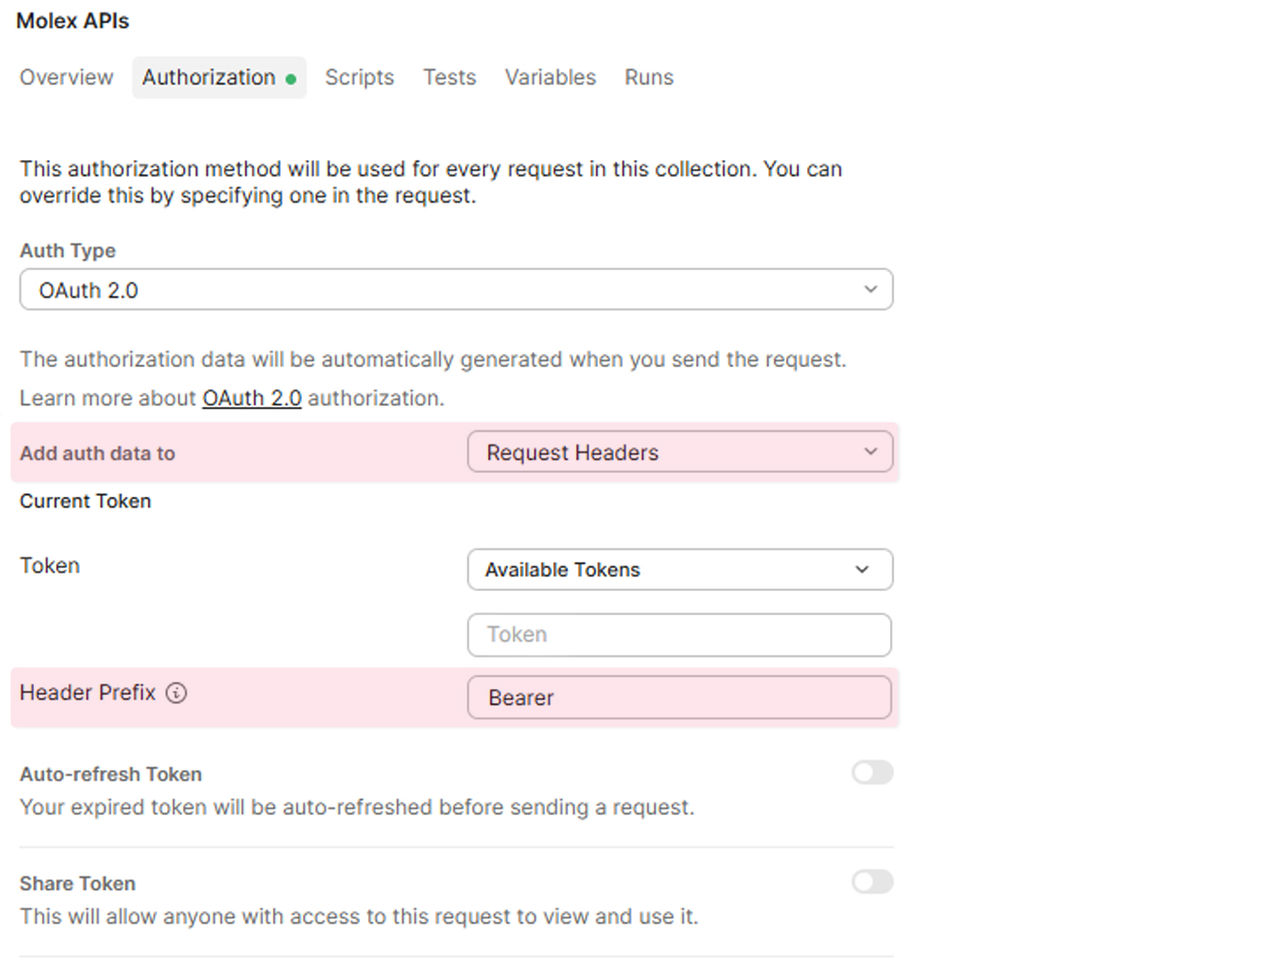
Step 3 - Fill in the Token Configuration
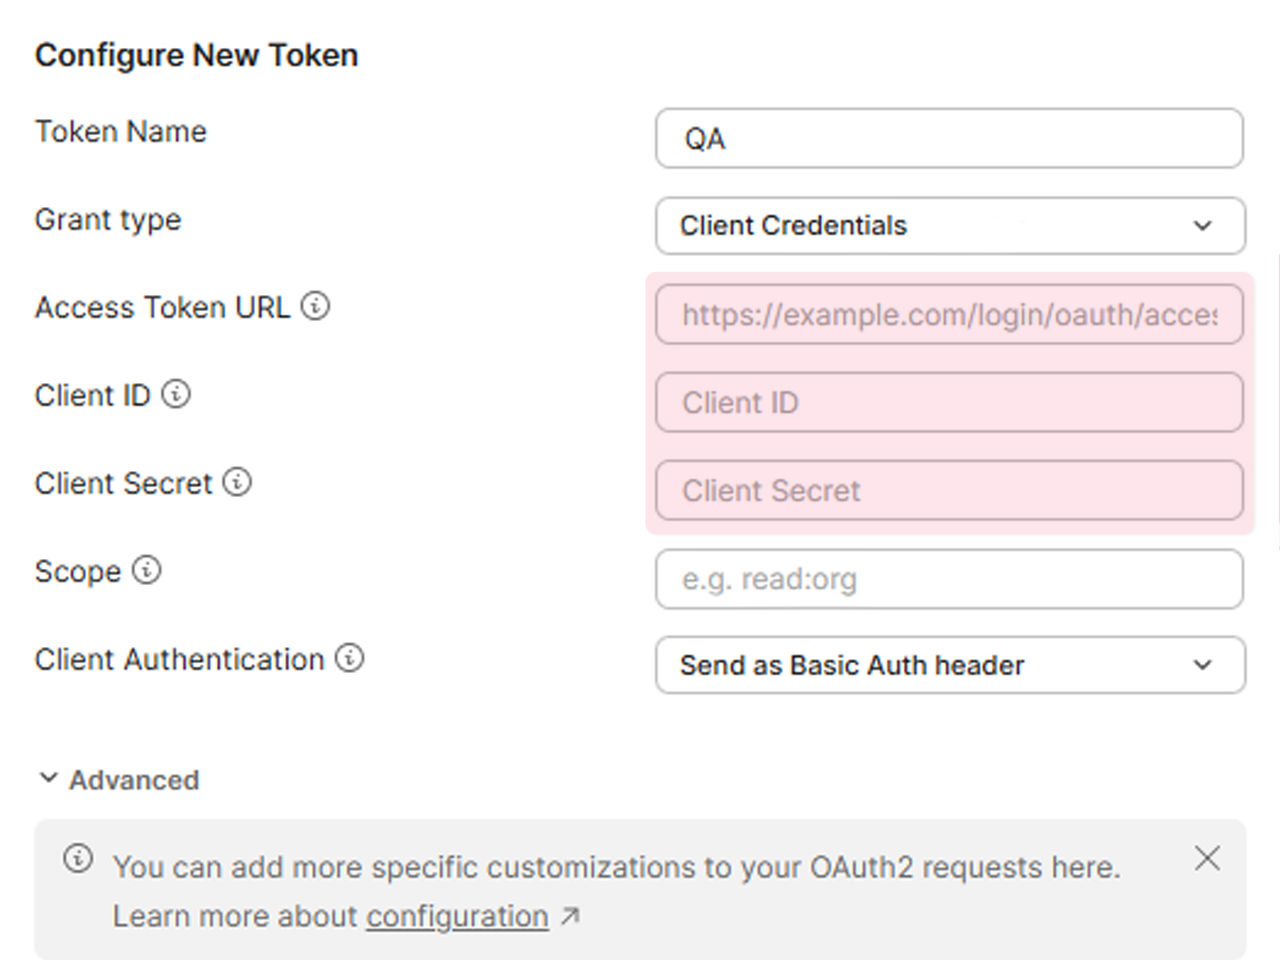
- Scroll down to Configure New Token, then add the information from the fields below.
Token Configuration
| Field | Value to Enter | Notes |
|---|---|---|
| Token Name | QA (or Production) | Choose a label to identify the environment to which the token belongs. |
| Grant Type | Client Credentials | App-level access without a user login is the correct access type for Molex APIs. |
| Access Token URL | {{tokenUrl}} | Postman replaces this with the tokenUrl variable from the active environment. |
| Client ID | {{clientId}} | Postman replaces this with your clientId variable. |
| Client Secret | {{clientSecret}} | Postman replaces this with your clientSecret variable. |
| Scope | (leave blank) | Not required for Molex APIs. |
| Client Authentication | Send as Basic Auth Header | Credentials are base64-encoded and sent in the token request Authorization header. |
Step 4 - Get your first access token
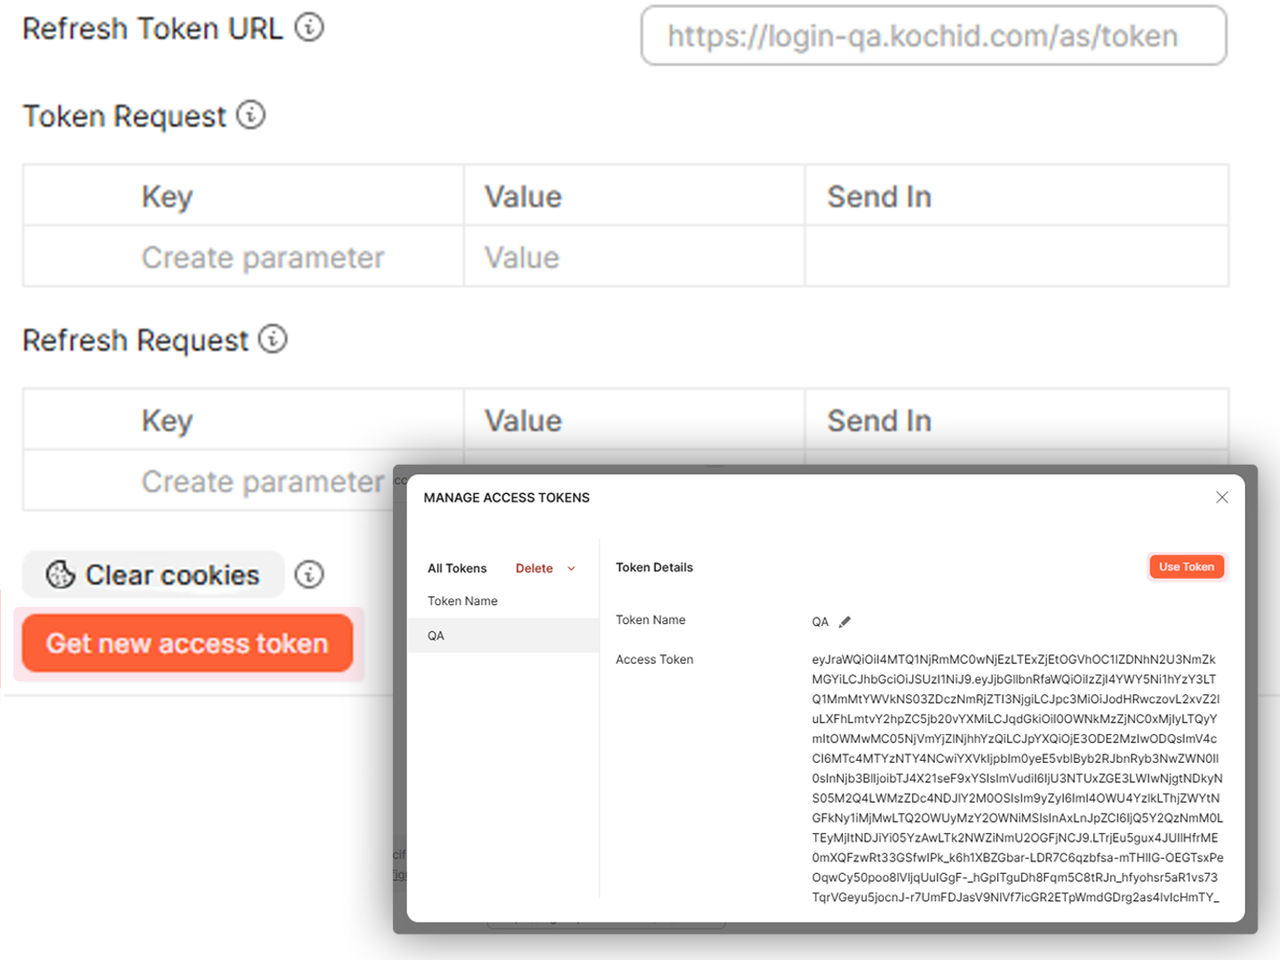
- Scroll down and select Get new access token.
- Postman will send your credentials to {{tokenUrl}} and wait for a response.
- If the request is successful, a pop-up window will appear showing the token value and expiration time.
- To activate the token, click Proceed, then Use Token.
Step 5 - Enable Auto-Refresh
- Auto-refresh allows Postman to automatically renew expired tokens, helping prevent errors caused by inactive tokens.
- On the Authorization tab, scroll down to Auto-refresh Token and switch the toggle to the on position.
- Click Save.
Adding a Request and Making Your First API Call
With the collection configured, you can begin adding requests. Each request requires a base URL. Depending on the endpoint, it may also require query parameters, a request body, or both.
Step 1 - Select Your Active Environment
- In the top-right corner of Postman, click the Environment dropdown.
- Select QA or Production based on your credential configuration.
Step 2 - Add a New Request to the Collection
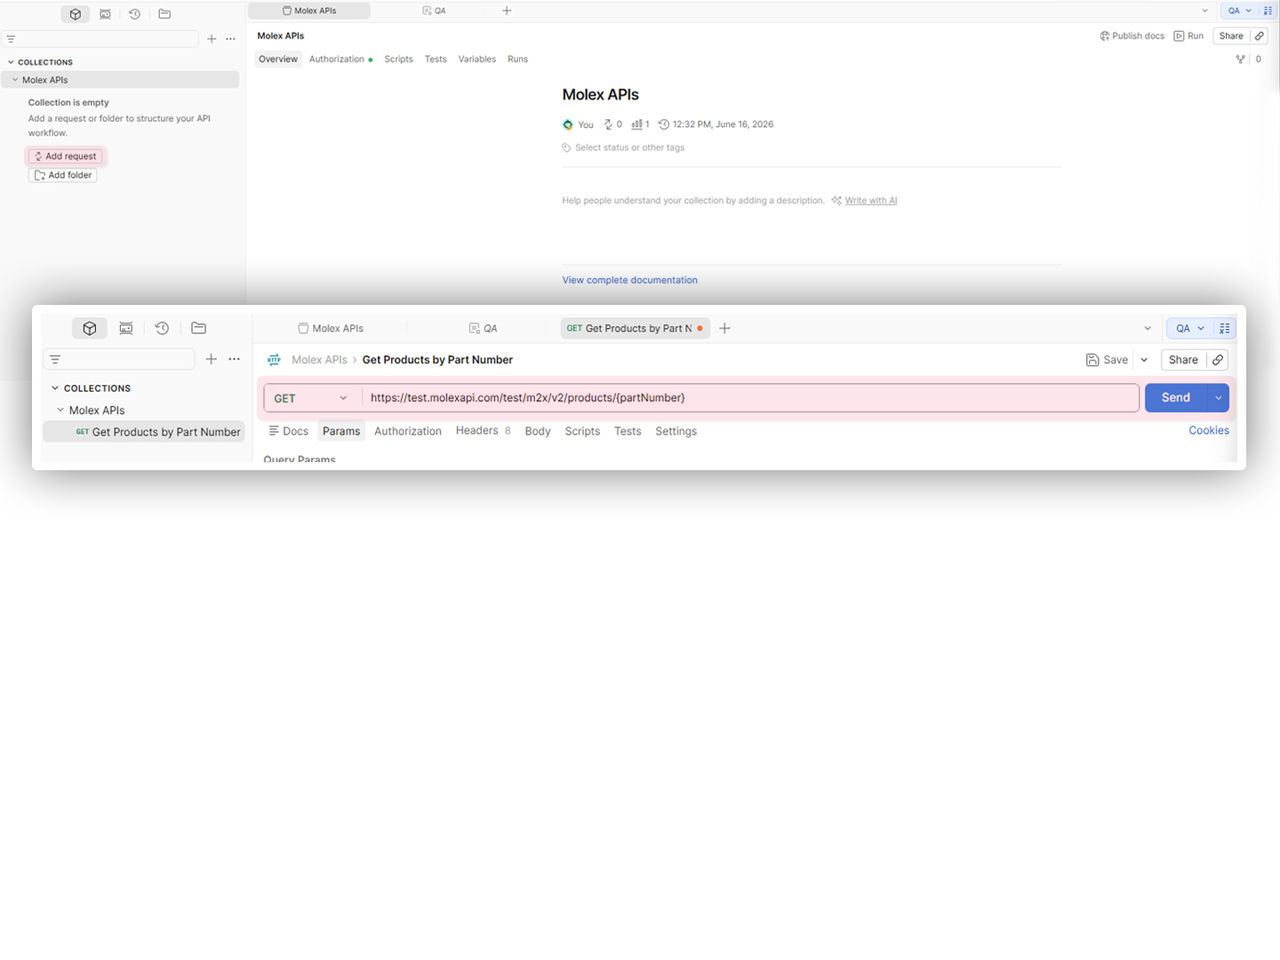
- In the left sidebar, click the three-dot menu next to the Molex API V2 collection, then select Add Request.
- Enter a description name for the request.
- Click Save.
Step 3 - Enter the Request URL
An API request URL is formed by combining the base URL with the endpoint path.Using {{baseUrl}} ensures Postman pulls the correct base URL from the selected environment.
- At the top of the request editor, type the full URL into the Request URL bar.
- Using the dropdown to the left of the URL bar, set the HTTP method to GET.
URL Values
| URL Component | Example Value | Description |
|---|---|---|
| Base URL variable | {{baseUrl}} | Resolves from your environment (e.g. https://test.molexapi.com:443 for QA) |
| Path prefix | /test/m2x/v2 | Identifies the API version and environment context |
| Endpoint path | /products/{partNumber} | The specific resource requested (provided by Molex support) |
| Full example (QA) | {{baseUrl}}/test/m2x/v2/products/12345 | Postman resolves {{baseUrl}} after hitting Send |
Step 4 - Add Query Parameters
Query parameters filter or refine the data returned by an endpoint. Add them through the Params tab rather than appending them manually to the URL. Postman handles the encoding and formatting automatically.
- Click the Params tab.
- In the Key column, enter the parameter name.
- In the Value column, enter the corresponding value.
Step 5 - Check the authorization tab on the request
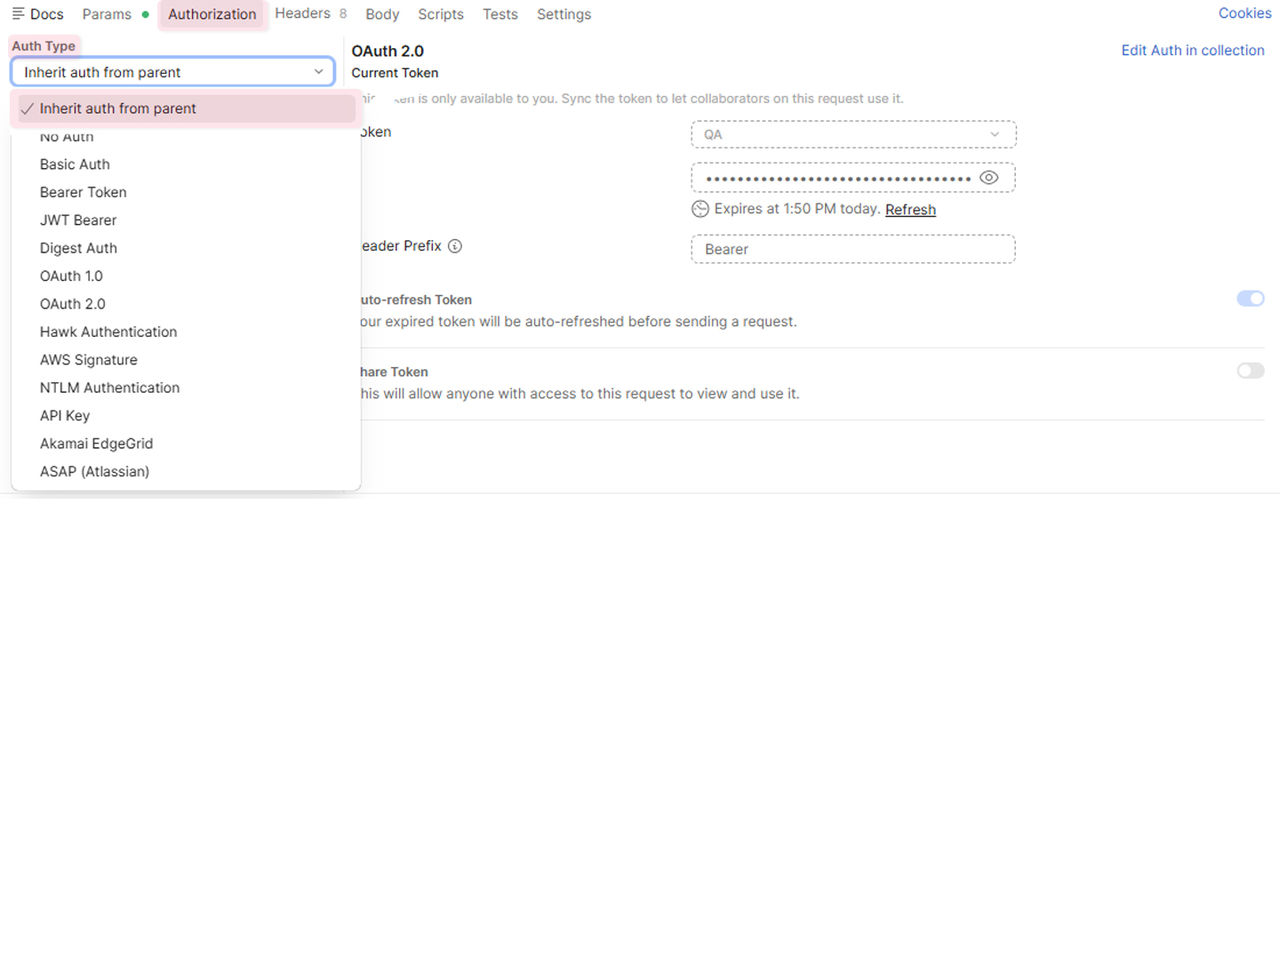
- On the individual request, click the Authorization tab.
- In the Auth Type drop down, confirm the type is set to Inherit Auth from Parent.
This setting should remain static, as it ensures that the bearer token is attached automatically and eliminates the need for manual entry.
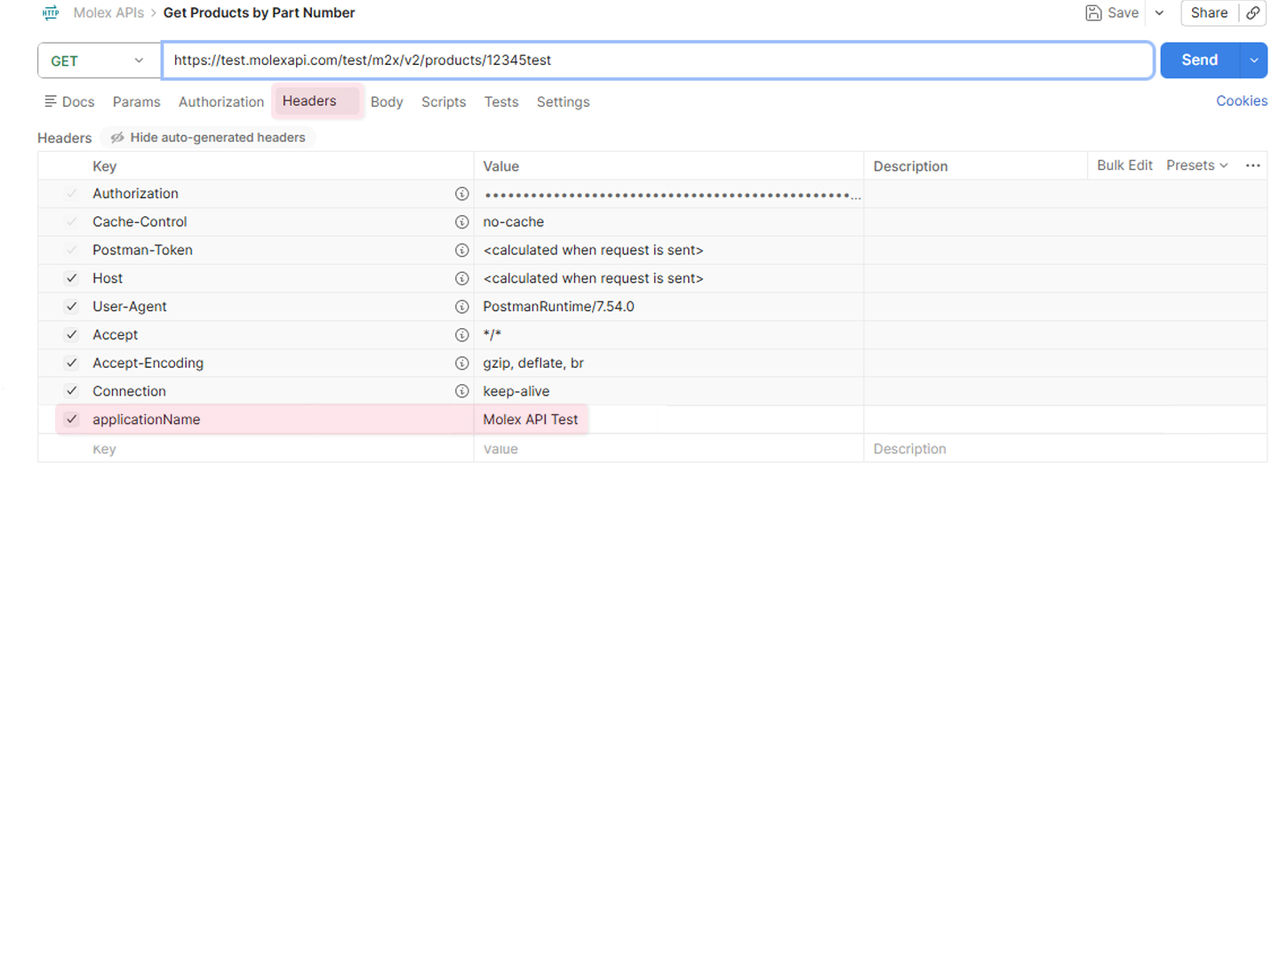
Step 6 - Check the Headers Tab on the Request
- In the individual request, click the Headers tab.
- Confirm the applicationName is present.
- If it is missing, add a header with the key applicationName and the value set to the application name.
Step 7 - Send the Request
- Click the Send button.
Postman will attach an authorization header with the value bearer <token> and automatically send the request to the API. The response will appear in the lower-left panel.
Troubleshooting
Use the table below to troubleshoot the most common issues. Most problems result from one of the following issues:
- Selecting the wrong environment.
- Mistyping an environment variable.
- A request failing to inherit authentication from the collection.
Common Errors
| Error or Symptom | Most Likely Cause | Fix |
|---|---|---|
| 401 Unauthorized on an API request | Token is missing, expired, or not applied to the request | Go to the collection authorization tab. Click get new access token, then use token. Confirm auto-refresh is on and the request authorization is set to inherit auth from parent. |
| 401 on the token request (invalid_client) | clientId or clientSecret is incorrect | Open the active environment and verify both values exactly match what Molex provided. Click save and try it again. |
| Token request fails immediately with an error | Wrong tokenUrl for this environment | QA requires login-qa.kochid.com. Production requires login.kochid.com. Check your tokenUrl variable value. |
| {{baseUrl}} or {{tokenUrl}} literally appears in the URL | No environment is selected in Postman | Click the environment dropdown in the top-right corner of Postman and select QA or production. |
| Request sends but no authorization header is attached | Request authorization is not set to inherit | Open the request, go to the authorization tab, and set the type to inherit auth from parent. |
| Token refreshes but requests still return error 401 | Credentials belong to a different environment | Ensure the active environment matches the credentials. |
| Params are not appending to the URL | Parameter rows are unchecked or the wrong tab is open | Click the params tab and confirm each parameter row has its checkbox ticked on the left. |
| Response returns unexpected data or empty results | Incorrect parameter values or wrong endpoint path | Double-check parameter names and values against the endpoint documentation from Molex support. |
Reference Tables
Environment Variable Reference
One set of variables must be created for each environment. Since Postman is case-sensitive, the names must be an exact match.
Environment Variables
| Variable | Environment | Value | Description |
|---|---|---|---|
| tokenUrl | QA | https://login-qa.kochid.com/as/token | OAuth 2.0 token endpoint for QA |
| tokenUrl | Production | https://login.kochid.com/as/token | OAuth 2.0 token endpoint for production |
| clientId | Both | Provided by Molex | The application's public identifier |
| clientSecret | Both | Provided by Molex | Private secret—use secret type in Postman |
| baseUrl | QA | http://test.molexapi.com:443 | Base URL for all QA API requests |
| baseUrl | Production | https://api.molex.com | Base URL for all production API requests |
Collection Authorization Settings Reference
The values in the table below are for use in the configure new token section of the collection Authorization tab.
Collection Authorization Settings
| Field | Value |
|---|---|
| Token Name | QA or production |
| Grant Type | client credentials |
| Access Token URL | {{tokenUrl}} |
| Client ID | {{clientId}} |
| Client Secret | {{clientSecret}} |
| Scope | (leave blank) |
| Client Authentication | Send as basic auth header |
| Auto-refresh Token | Enabled |
| Header Prefix | bearer |
| Add auth data to | Request Headers |
Request Construction Reference
When building requests in Postman, use the patterns in the table below.
Request Construction Patterns
| Setting | Where to Configure | Value/Instruction |
|---|---|---|
| HTTP Method | Dropdown left of URL bar | GET, POST, PUT, DELETE—provided per endpoint by Molex support |
| Request URL | URL bar | {{baseUrl}}/test/m2x/v2/<endpoint-path> |
| Query Params | params tab | Enter key and value per parameter row; Postman appends to URL |
| Request Body | Body tab (POST/PUT) | Select raw + JSON; paste body as provided by Molex support |
| Authorization | Authorization tab | Must be set to inherit auth from parent on every request |
| Headers | Headers tab | Content-Type: application/json is typically required for POST/PUT requests |